
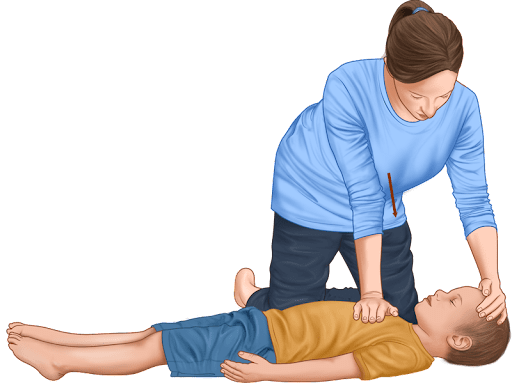

Performing Child CPR is an activity no parent wants to do. However, children are prone to accidents that can turn into an emergency situation that requires cardiopulmonary resuscitation.
If your child stops breathing, you must start CPR straight away. Your calm, clinical demeanour and quick reaction time can save your child from brain damage and death.
Here are some step-by-step instructions on how to perform CPR on a child. We’ll discuss how to perform chest compressions, rescue breathing, and life-saving first aid for children.
Last reviewed: September 2026 — checked against Resuscitation Council UK Guidelines 2025.
What Is CPR?
CPR, or cardiopulmonary resuscitation, is a life-saving procedure designed to get the heart to beat again and the lungs to accept air again, reintroducing normal breathing to the patient.
Basic Life Support is the first step in most first aid courses, as adult CPR training is a must-have for every person, regardless of whether or not they wish to perform duties as a first responder.
One does not need to undergo board-certified training courses to conduct CPR, as the basics are easy and important to grasp.
However, training allows responders to gauge the amount of pressure needed to perform the movements. You wouldn’t want to break ribs or crush noses when you perform CPR on children during an emergency.
It is important to note that while the fundamental movements are the same, some adjustments must be made from adult CPR to CPR for children and infants. The biggest difference: every child and infant should be given five initial rescue breaths before chest compressions begin. Other situations also call for a modified technique, such as performing CPR on a pregnant woman.
If a child shows signs and symptoms listed below, then it is vital to call for emergency help and then start CPR straight away:
- Unresponsive
- Not breathing normally and the chest does not rise
- Showing no signs of life (not moving, coughing or reacting). Do not waste time feeling for a pulse — check for breathing and signs of life for no more than 10 seconds.
How to Perform Infant CPR (Ages 0-1)
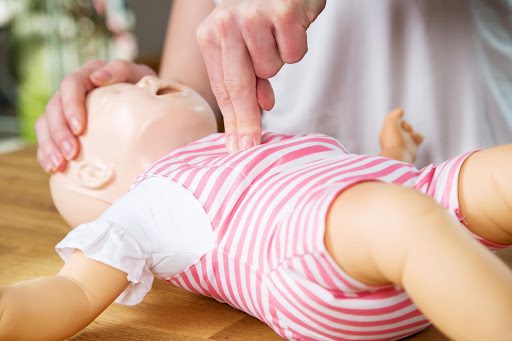
Infant CPR may be one of the scariest things in the world for a new parent or child carer. When done right, you can ensure the child lives a long and healthy life.
The child must start breathing again soon, as every minute they lack breath increases the risk of permanent damage and death if you do not act quickly.
Step 1: Determine Responsiveness and Call 999
Infant CPR begins when your child appears unresponsive. Gently tap your child and talk to them to see if they respond by cooing, crying or moving. Do not shake them, and do not use painful stimuli.
If they’re unresponsive, call 999 immediately. It is better to have someone else in the area call emergency services while you begin CPR. If you are alone, call 999 yourself on your phone’s speaker function so your hands stay free, and follow the call handler’s instructions. Only if you have no phone at all should you perform CPR for 1 minute before leaving the infant to go and get help.
Step 2: Open the Airway and Check Breathing
Place the infant on their back on a firm, flat surface. Keep their head in a neutral position — tilt it back only slightly — and lift the chin with two fingers on the bony part of the chin, without pressing on the soft tissues underneath.
With the airway open, look, listen and feel for normal breathing and signs of life for no more than 10 seconds. Occasional gasps are not normal breathing. If you are in any doubt, act as if breathing is not normal.
Step 3: Give 5 Rescue Breaths
Every infant who is not breathing normally gets five initial rescue breaths — before any compressions. Seal your mouth over the infant’s mouth and nose together and blow steadily for about one second, just enough to see the chest rise. Let the chest fall, then repeat until you have given five breaths.
If the chest does not rise, check the mouth for any visible obstruction (do not do a blind finger sweep) and reposition the head before trying again.
Step 4: Begin Chest Compressions
After the five rescue breaths, immediately start chest compressions. Use the two-thumb encircling technique: encircle the infant’s chest with both hands, place both thumbs side by side on the lower half of the breastbone, and compress.
Perform 30 chest compressions in a steady, quick cadence (100–120 per minute), pressing down by at least one-third of the depth of the chest. Release the pressure fully between compressions and let the chest recoil completely before the next push.
Step 5: Continue CPR Until Emergency Help Arrives
Continue CPR at 30 compressions to 2 rescue breaths (use 15:2 if you are specifically trained in paediatric basic life support) until the infant shows clear signs of life or help takes over. If they start breathing normally, hold them securely on their side with the head slightly lowered, or place them in the recovery position, and keep checking their breathing.
Continue performing until paramedics arrive to stabilise the baby.
How to Perform Child/Paediatric CPR (Ages 1+)
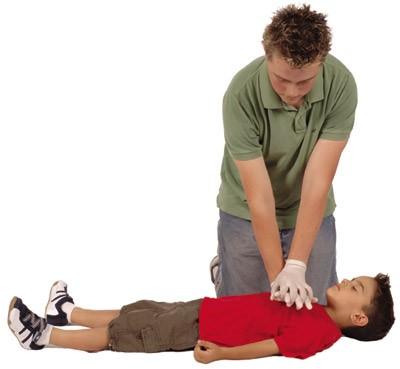
Children’s CPR is CPR for anyone between the ages of 1 and 12. For teenagers, use the adult technique — including the adult compression depth of 5–6 cm. If you are unsure of a child’s age, treat them according to how old they appear: it is always better to act than to do nothing.
You must take great care when conducting CPR on a child. You must always be aware of their breathing ability by keeping their airway open. You must also be sure not to crush any ribs when compressing.
Step 1: Determine Responsiveness and Call 999
When your child is unconscious and unresponsive, you must tap them gently and ask them, “Hey, Hey, are you alright?” Call for help in a loud voice if they remain unconscious and prepare to perform CPR.
Call 999 immediately, or have someone else call while you start CPR. If you are alone, use your phone’s speaker function and follow the call handler’s advice. Only if you have no phone should you perform CPR for 1 minute before going to seek help.
It is best to move the child if the area you found them in is not safe. However, you must be careful not to exacerbate any spinal injury they may have received.
Step 2: Open the Airway
Tilt their head back by keeping a hand on the child’s forehead and lifting their chin with your fingertips. Move carefully to avoid spinal injuries. Give your child the best possible airway path — older children need more head tilt than infants.
Step 3: Check for Breathing
With the airway open, look, listen and feel for normal breathing and signs of life for no more than 10 seconds. Occasional gasps are not normal breathing. If you have any doubt whether breathing is normal, act as if it were not normal.
If the child is breathing normally, stop here: place them in the recovery position, keep their airway open and check their breathing at least every minute until help arrives.
Step 4: Give 5 Rescue Breaths
If the child is not breathing normally, give five initial rescue breaths before starting compressions. Squeeze the soft part of the nose to keep the nose closed.
Keeping the nose closed and mouth open will prevent air escaping and funnel all of your efforts into their airway. Seal your mouth over theirs and blow steadily for about one second, just enough to see the chest rise. Let the chest fall, then repeat until you have given five breaths.
If the chest does not rise, remove any visible obstruction from the mouth (no blind finger sweeps) and reposition the head before your next attempt.
Step 5: Begin Compressions on the Child’s Chest
After the five rescue breaths, immediately begin chest compressions. Place the heel of one hand on the lower half of the breastbone and conduct 30 compressions in rapid succession. Use one hand or both hands — whichever you need to press down by at least one-third of the depth of the chest. Release fully between compressions so the chest can recoil.
You must maintain a 100–120 per minute cadence, similar to ABBA’s song ‘Dancing Queen.’ Count 1 to 30 out loud before stopping to perform two rescue breaths, then continue the cycle.
Step 6: Continue Compressions until Emergency Help Arrives
Child CPR needs to continue at 30 compressions to 2 breaths (15:2 if you are specifically trained in paediatric basic life support) until you detect clear signs of life, in which case you can put the child in the recovery position. However, you may need to continue until medics arrive.
If another person is with you, send them to fetch an Automated External Defibrillator (AED) and attach it as soon as it arrives — you can follow the instructions it gives, allowing you to shock the patient and then perform compressions immediately after. If you are on your own, do not leave the child to fetch an AED: calling 999 and doing CPR come first. For more on correct electrode positioning, see our guide to the proper placement of defib pads.
Frequently Asked Questions
Here are some important questions that every parent needs to be answered regarding child CPR. It would help if you memorised the answers to keep your children safe and healthy.
What Is the Ratio for CPR in a Child?
Children are smaller and more sensitive than adults. You must be considerate of their frailty when you begin CPR. For a child, use one hand or both hands — whatever you need to push down at least one-third of the depth of the chest.
Infants need a different technique: use the two-thumb encircling method — encircle the chest with both hands and compress the lower half of the breastbone with both thumbs.
When performing CPR on a child or infant, you must give five rescue breaths first, then 30 compressions, then two breaths immediately after. Repeat the 30:2 ratio until help arrives. (If you are specifically trained in paediatric basic life support, use 15 compressions to 2 breaths instead.)
How Many Chest Compressions for a Child?
The ratio of 30 chest compressions for every 2 mouth-to-mouth rescue breaths is the same whether performing CPR on a child, infant, or adult — the difference is that children and infants get five initial rescue breaths before the cycles begin. Compressions must be performed at 100 to 120 per minute.
This cadence is consistent with the beat of the BeeGees’ hit song ‘Stayin’ Alive.’ You must follow the cadence and pump 30 times in rapid yet consistent succession.
There is no fixed number of sets that you should do 30 compressions, as each case will yield different results. You must perform compressions until you notice clear signs of life or until EMS appears.
When Should You Contact a Medical Professional?
You should contact a health professional or emergency help immediately after discovering your child is unconscious. If someone else is with you, they must contact emergency services while you conduct CPR.
If you are alone and have a mobile phone, call 999 straight away on speakerphone and start CPR while you speak to the call handler — do not delay the call to do CPR first. Only if you have no phone at all should you perform CPR for 1 minute before leaving to get help.
Your goal is to perform rescue breathing and chest compressions until the paramedics arrive. If you are unwilling or unable to give rescue breaths, do chest compressions on their own — it is far better than doing nothing. Once the paramedics arrive, they can stabilise the child for transport to the hospital.
Conclusion
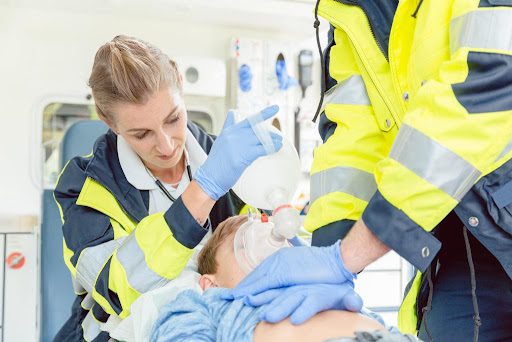
In a life-threatening emergency, you must be willing and able to perform child CPR from start to finish until your child recovers, breathing normally, or an ambulance arrives.
When in doubt, it is important to stay calm and act decisively. Call 999, give five rescue breaths, and keep blood and air moving with chest compressions and rescue breathing until help takes over.
If you would like to further your first aid skills we also offer a range of first aid courses and paediatric first aid courses.
Become a qualified gas engineer
Our New Entrant Gas Engineer courses take you from beginner to Gas Safe registered, with hands-on training and the ACS qualifications employers look for.
Blog categories
Keep up to date with the latest news from
Skills training group.